Drywall
Drywall tape is essential for creating smooth, seamless walls, but when it begins to bubble or peel, it can be both unsightly and structurally problematic. Homeowners may notice these issues due to poor installation, humidity, or natural wall shifts over time. Fortunately, repairing drywall tape is a manageable DIY project when done correctly. Understanding why tape fails and following the proper repair steps can restore the wall’s integrity and appearance. For complex repairs, professional drywall repair Phoenix services can ensure long-lasting results. Here’s a step-by-step guide to fixing bubbling or peeling drywall tape effectively.
Why Tape Fails: Common Installation Mistakes
1. Insufficient Joint Compound
Applying too little joint compound beneath the tape prevents it from adhering properly, causing it to lift or bubble over time. The compound acts as an adhesive, and an uneven or inadequate layer weakens the bond. A smooth, even coat of compound should fully cover the seam before embedding the tape. The proper application ensures strong adhesion and prevents future peeling.
2. Excess Moisture in the Air
High humidity levels can interfere with the drying process, weakening the bond between the tape and drywall. This issue is particularly common in bathrooms, kitchens, and basements, where moisture levels fluctuate. If moisture remains trapped under the tape, it can lead to bubbling and peeling over time. Using a dehumidifier or running ventilation fans during installation can help reduce the risk of moisture-related failures.
3. Rushed Drying Process
If the joint compound isn’t given enough time to dry between coats, trapped moisture can lead to bubbling or separation. Many DIYers try to speed up the process by applying thick layers or painting too soon, which weakens adhesion. Each layer of the compound should dry completely before sanding and applying the next coat. A well-paced drying process prevents premature failure.
4. Using the Wrong Tape Type
Selecting the wrong type of drywall tape can affect adhesion and durability. Paper tape works well with joint compounds but requires proper embedding to avoid air pockets, while mesh tape has better adhesion but needs a setting-type compound to prevent cracking. Choosing the right tape for the specific drywall application can improve longevity and reduce the risk of peeling.
Removing Loose Tape Without Causing More Damage
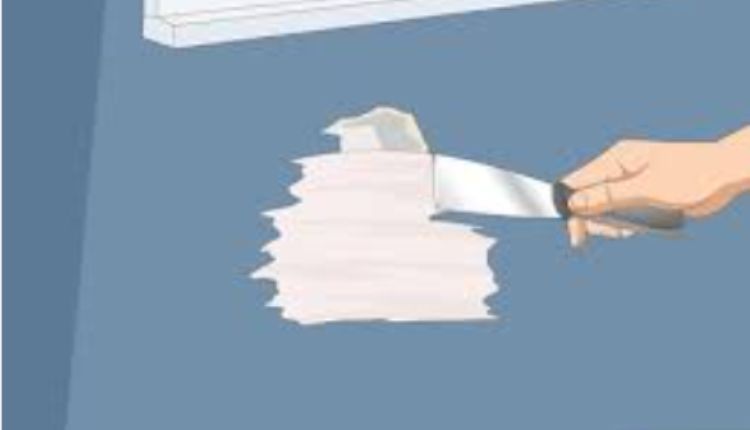
1. Score Around the Tape
Use a utility knife to cut along both sides of the damaged tape. This prevents further peeling and keeps the surrounding drywall intact. A precise cut ensures a clean removal and reduces the risk of tearing the drywall surface.
2. Gently Peel Off the Tape
Pull the loose tape away slowly, ensuring the drywall underneath remains undisturbed. If resistance is met, use a putty knife to lift it gently. Rushing this step may cause additional damage, making the repair process more complicated.
3. Sand the Area Smooth
After removing the tape, use fine-grit sandpaper to smooth out any remaining adhesive or rough compound edges. A smooth surface helps new joint compound adhere evenly and prevents imperfections from showing through the final finish.
4. Wipe Away Dust
Clean the area with a dry cloth or a slightly damp sponge to remove dust and debris before reapplying the tape. Leftover dust can prevent joint compounds from adhering properly, leading to weak adhesion and future peeling.
Applying Joint Compound Correctly: Avoiding Air Bubbles
1. Use the Right Consistency
The joint compound should have a creamy, spreadable texture. If it’s too thick, it won’t adhere well, and if it’s too watery, it won’t provide enough support for the tape. Mixing to the right consistency ensures strong adhesion and a smooth application.
2. Apply an Even Base Layer
Spread a thin, consistent layer of compound over the seam before placing the tape. This prevents air pockets from forming and ensures a strong bond. Applying too much compound can lead to excess buildup, making it harder to smooth out bubbles.
3. Embed the Tape Firmly
Press the tape into the wet compound using a drywall knife, smoothing out any bubbles as you go. Applying firm but gentle pressure helps eliminate trapped air and ensures full adhesion.
Sealing the Repair Properly: Preventing Future Peeling
1. Apply Multiple Coats
After the initial layer dries, add one or two more thin coats of joint compound, feathering out the edges each time. Extending the compound beyond the tape helps blend the repair with the surrounding wall.
2. Sand Between Layers
Lightly sanding between coats creates a smooth, professional-looking surface. Using fine-grit sandpaper removes imperfections and ensures an even texture that won’t be noticeable after painting.
3. Prime Before Painting
Using a quality primer seals the repair and prevents inconsistencies when applying paint. Without primer, the repaired area may absorb paint differently than the rest of the wall, leading to uneven coloration or texture.
4. Choose High-Quality Paint
Matte or eggshell finishes work best to hide imperfections, while glossy paints may highlight uneven textures. High-quality paint provides better coverage and durability, reducing the likelihood of future touch-ups.
Conclusion
Bubbling or peeling drywall tape can be frustrating, but with the right approach, it’s an easy fix. Understanding the causes of tape failure, carefully removing damaged sections, selecting the appropriate tape, and applying joint compound correctly are essential steps for a successful repair. Sealing the area properly prevents future issues and ensures a seamless, professional finish.
For homeowners who prefer a flawless result without the hassle, drywall contractors Phoenix, like Professional Home Repair, can provide expert repairs and long-lasting solutions. Whether it’s a small patch or a larger drywall issue, professionals have the experience and tools to get the job done efficiently. Properly maintaining drywall ensures a smooth, durable surface that enhances the appearance and value of any home.